One of the most loved and anticipated food rituals is and probably always will be Sunday lunch. Getting family and friends to join you for a roast of some variety always feels like something special… and in a way impressive… and maybe if you’re not much of a cook, extremely daunting.
But what if told you that a roast chicken with two hearty sides is well within the reach of anyone who can stir and that I could teach you how to do it? Don’t believe me? Why not take on the challenge and prove your naysayers wrong! Check out my step-by-step guide to lemon and rosemary roast chicken with roast potatoes and carrots and broccoli and cauliflower cheese.
Ingredients
Three medium disposable foil baking trays – less washing up and if you don’t cook often you won’t have to buy anything special. Alternatively you can use baking or roasting trays if you have them.
For the chicken
1 medium to large whole chicken (1.2kg – 1.5kg)
80g butter, softened
2 tablespoons of olive oil
4 cloves of garlic, crushed… or cheat like I do and buy it minced in a tube and use 1 heaped tablespoon full
4 lemons
4 sprigs of fresh rosemary
1 large onion, sliced horizontally
Salt
Pepper
For the potatoes and carrots
3 large potatoes (Maris Piper if you can)
2 large carrots
Olive oil
Salt
Pepper
For the broccoli and cauliflower
2 packages of pre-cut mixed broccoli and cauliflower (cutting it into florets is a pain in the butt so saved yourself time)
2 teaspoons olive oil
1 tablespoon flour
1 cup milk
2 large handfuls of grated mature cheddar cheese (again, you can just buy it grated)
Salt
Pepper
Start about 2 hours before you actually want to eat. And if you can remember to, take your butter out of the fridge half an hour before that. It’s much easier to work with.
Turn your oven onto 200 C. If you have a fan assisted oven then 180 C.
First take your chicken out of its packaging, don’t throw the packaging away. If its legs are attached together then cut off the string. It’s now time to make friends with your chicken because you’re about to get up close and personal. Don’t be afraid of it. Remember its already dead and you can wash your hands. First rinse your chicken under the kitchen tap on the outside. Then lift up the flap of skin by its neck and run some water through it to rinse the inside. Pat it dry with some paper towel and place it on a large cutting board. Then generously salt and pepper it inside and out on all sides.
Now zest the lemons. If you ever wondered what the skinny side of the cheese grater was for, this is it. You’re going to scrape just the yellow part of the peel off the lemon into a medium bowl (a soup or cereal bowl is perfect). It’s just a couple of scrapes in each spot because you don’t want any of the white pith.
Remove the leaves from two of your sprigs of rosemary and finely chop them. Or cheat like I do, bunch them together and cut them with your kitchen scissors. Put this in with the lemon zest. Add the butter, olive oil and garlic and mash it all up into a paste with a spoon or a fork.
Now comes the messy bit. Lift up your chicken’s skin flap at the neck end and slide your hand between the chicken’s skin and it’s flesh towards the bum end. It should separate easily. Then take a couple of handfuls of your butter mixture and squish it into the gap, spreading it out to cover as much of the chicken’s flesh as possible. The take the rest of your mixture and spread it all over the chicken, giving it a bit of a massage as you go. It’s messy but very worth it.
Wash your hands and then slice two of your lemons horizontally. Layer them up with your onion slices and then wedge them up the chicken’s bum along with the remaining rosemary sprigs.
Pop your chicken breast side up into one of your foil trays. Cut one of your remaining lemons in half and squeeze it over the chicken.
Once your oven has reached the required temperature, pop the chicken in on the middle shelf. On the wrapper of your chicken it should say approximately how long to cook it for. For a medium to large chicken it’s normally about 75 – 90 minutes. Set your timer (or your phone) to go off when the chicken has 45 minutes left to cook. e.g. if it’s 75 minutes, set it for 30 minutes, if 90 minutes, set it for 45 minutes. Feel free to now chuck out the packaging.
You should now have time for a glass of wine and a prayer to the food gods if you feel you need one.
When your chicken is 10 minutes from the 45 minute mark, it’s time to start preparing your veg. Peel the carrots and cut them into 2cm thick chunks. If your carrots are really wide and the top then you can cut the bigger chunks in half. Now cut the potatoes into similar style chunks. There is no need to peel them but if they have any significant bruises or welts you can cut them out.
Put the the veg in your second foil tray and drizzle with olive oil and a good shake of salt and pepper. Then mix everything up to coat well.
By now your timer should have gone off. Take your chicken out and arrange your oven trays so one is at the bottom of the oven and one is at the top. Close the oven door.
Take an oven glove or thick tea towel and tilt your tray gently. Cooking liquid from the chicken will run down into the end of the tray. Take a large serving spoon or ladle and scoop this up and pour over your chicken. Keep repeating until your whole chicken is covered with liquid (This is known as basting and will stop your chicken from drying out). If your chicken is already looking quite brown, you should cover it with foil. This will stop the outside from overcooking.
Now return the chicken to the bottom tray of the oven. Place your veg tray at the top. Make sure you put it in vertically on the side because a second tray is going to go next to it. Reset the timer for 45 minutes.
The next step is probably the only one that could prove challenging but I promise it is easier than it sounds and you can do it. However, if you genuinely can’t face it, just buy a tub of cheese sauce. I won’t tell anyone.
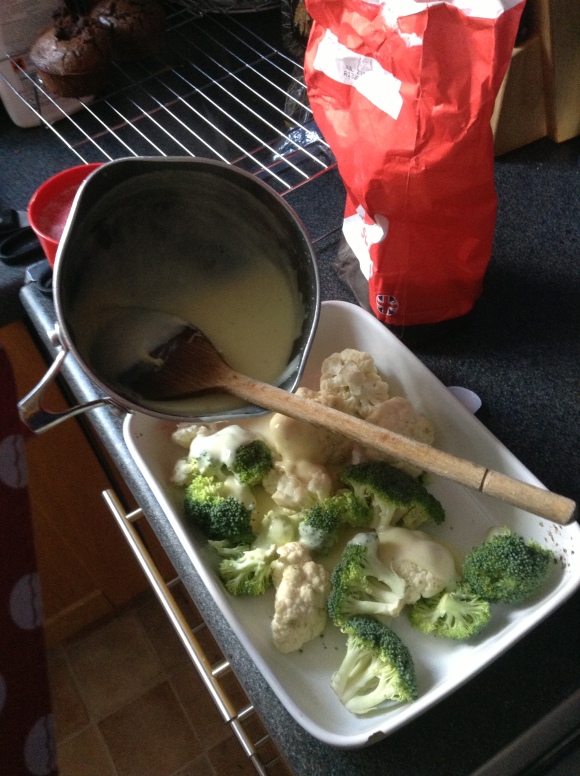
Get out your third tray and spread out your broccoli and cauliflower on it. If you have any really big florets, then cut them in half.
To make the cheese sauce, put a small pot over a medium heat on the hob. Add two teaspoons of olive oil and heat for about 30 seconds until it becomes really runny. Take it off the heat and stir in the flour with a wooden spoon. It will make a paste.
Now add the milk a little at a time and stir well after each addition. When I say a little, I mean a little. Like a couple of teaspoons. If you combine it like this, you shouldn’t get any lumps. However, if you have one or two small ones, it really isn’t a big deal. Once you thicken it up and add the cheese, you’ll never know. Once you get to a consistency that is mostly liquid you can add bigger quantities of milk at a time. Add a little salt and pepper.
Return the pot to the hob over a medium heat. and stir continuously until your sauce starts to just boil. If it goes beyond the occasional bubble then adjust your temperature down. Your sauce should now be getting nice and thick. When you can lift your spoon out of the sauce and it coats the back of the spoon, it’s time to add the cheese. This should take 2 – 3 mins from the point that it boils.
Add two handfuls of the cheese to the sauce and keep stirring over the heat until the cheese is all melted in. Voila! Cheese sauce. You can use this base to make pretty much any white sauce.
Pour the sauce over the broccoli and cauliflower.
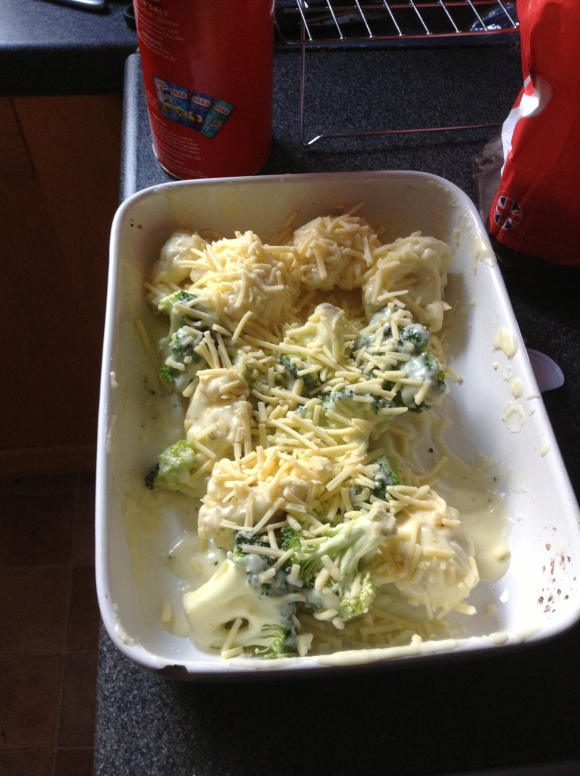
 Sprinkle the remaining cheese over the top.
 Slide the broccoli and cauliflower tray in next to the carrots and potatoes in the oven.
Have another glass of wine.
When the timer goes off, remove the chicken from the oven. Take off the foil if you’ve covered it and leave it to rest for 15 minutes (set the timer). This is important as the meat will keep cooking once out of the oven and the juices need to settle. If you want to be 100% sure that your chicken is cooked through then jab it with a serving fork and look at the colour of the juice that runs out. If it is clear it is all good. if it is pink at all, your chicken needs a little longer. It should be cooked though.
At the same time give the broccoli and cauliflower a quick look. If the cheese is brown and bubbling, you can take it out now. If not leave it 5 more minutes and check again.
When your 15 minutes is up, remove the potatoes and carrots from the oven and serve everything together… just don’t look at me for how to carve the chicken…


Reblogged this on simplequickrecipes.
Thanks for reblogging!
Yum! I’m coming to yours for Sunday lunch. And… I never have much more to add to your yummy looking food posts as I absolutely hate cooking with a passion. Like eating, though! Eating is good.
I didn’t really get into cooking until I lived with this flatmate who was an incredible cook. There were 5 of us who lived together and because we were all friends we ate together too. She and I were always first home from work so we’d cook dinner for the whole house together almost every night. I learned so much from her. I also started to become really conscious of not wanting to eat loads of processed food. I like cooking from fresh because I feel like I have a better idea of what I’m eating. It’s not for everyone though. I love feeding people so anyone who likes eating is always welcome in my home!
[…] Sunday Lunch for beginners seemed to be quite popular so I’ve decided to do another basic recipe simplified down so that […]